Tuesday, May 31, 2011

Gameboy Bag

Remember the old school gameboys?


A few years ago, we were given a couple of these without the games for our boys to have. We put them aside for when they were older. 

My biggest guy is about to turn 6, and we went back and forth on buying him a gameboy type game system. But, they are really expensive, and we have two boys that are very close in age. Because of that, I hesitate to spend a lot on one and not the other, and cringe at the thought of something expensive getting broken because of a younger sibling.

Then the lightbulb went on again. The gameboys we had put away! Not only are they pretty sturdy, but we had two, and we could buy a bunch of games inexpensively and we could take them on our upcoming very long roadtrip!

I searched eBay like crazy and bought quite a few games so that they had a bunch to choose from that they could play between them. I am so excited to give this to them! 

The only problem was a way to carry it all. There are bags out there, but I wanted one that held it all in a functional way and suited my boys' personalities.

I was going to make a tutorial of this project because I was going to make two bags, but the first bag ended up being the only bag I made, so I do apologize for not having a how-to for this project.

It's not very difficult whatsoever, but unfortunately, I caught a really nasty cold that turned into a sinus infection, so my energy level took a major hit. You know the kind where you have to continue being mom, keeping up on the household chores, and other life responsibilities, oh and throw in your child's birthday party and prepare to take a very long vacation, and well.....I only made one bag!


Here's what I used though, so if you are interested, you can do one too! I made it up as I went along to suite the functions that we needed using what we had on hand here:


a curtain (it was heavier material)
hardware and a strap from an old diaper bag
felt for the applique.
2 zippers (you can buy big and shorten them to suit your individual projects)

I made a divider and one side had a middle pocket. This is good for the batteries and such. This is also the side where both gameboys, side by side are kept.


On the other side, I made more game pockets so that one whole side was all game pockets


I cheated on the strap because I used diaper bag hardware I had saved.


And there you have it! An old school gameboy(s) bag!

Pin It

Monday, May 30, 2011

Happy 6th Birthday to my First Baby!

Six years ago (on Memorial day) I became a mommy for the first time, to a beautiful 7 lb 8 oz baby boy with dark hair and sweet little ears. The birth was long and a bit traumatic, but after 24 hours and an emergency c-section, we finally met each other. As soon as I saw him, I loved him oh so very very much.


Now he's 6 years old, going into the first grade, and the best big brother ever. He has a beautiful smile, a contagious giggle and a big heart. He rides his bike without training wheels, is really starting to get the hang of reading and has a keen mind for music. He might think he knows more than he does at his ripe age of six, but you gotta love his confidence!

Happy Birthday (always my baby boy) Jaden!


(my picture isn't the greatest, but the subject is the best!)
Pin It

Friday, May 27, 2011

Winner winner!

Hey guys!

Checking in real quick to announce the Vintage Apron winner! (anyone decide to make their own? :))


The winner of the apron thanks to random.org is...

drum roll please...


....is Kelli Fisk!


Congrats, Kelli!


Pin It

Thursday, May 26, 2011

The Man Cold.

Last day to enter the giveaway! Make sure you head over to Thrifty Decorating and enter to win the Vintage Apron!

I made the "mistake" of getting sick.  You know what I mean ladies, no sympathy around these parts! And like most people who share a roof, my children and my husband got sick as well.

Except, my husband caught a different kind of sickness. He caught...

The Man Cold.


Pin It

Wednesday, May 25, 2011

Birdcage makeover

Make sure you head over to Thrifty Decorating and enter to win the Vintage Apron! 


Awhile back, I was on the lookout for a pretty and decorative birdcage to go on my table in my entry way. I wanted one of those tall skinny birdcages at Pottery Barn. But since my attention span and decorating changes a lot, I wasn't interested in spending a lot either. 

I looked around on Craigslist (which I have yet to buy from) and didn't see any, and figured when I find one, "Great!"

Well, one day, I went to a yard sale in my neighborhood and saw a lonely birdcage sitting on a table for 4.00. YES. FOUR DOLLARS! I snatched it right up, paid for it and gleefully sped away before she could change her mind.

At first glance, it wasn't impressive. There were some hot glue spots on it with remnants of feathers here and there like a craft project gone wrong. It was painted in a very country fashion. But I knew this had potential. 

I picked up some spray paint (Valspar "Mediterranean") and got right to work. I wish I had taken a before picture, but alas, I did not. You will just have to settle for the after picture!


I wanted to add some candles inside so I ran over to the dollar store and picked up 3 of their largest pillar candles. I still needed a larger one, and I was able to get the large one you see in the picture on sale for 10.00 and use a 10 off 10.00 coupon at Kohls! Picked up a hook and chain to hang it and it was complete!


It was larger than I had wanted since it didn't fit on my entry table, but I do really like it's alternative spot. Now I just need to find something else to go in that spot!


Pin It

Tuesday, May 24, 2011

Leigh's Blankies


About 9 months ago, a friend of mine from high school who lives back East sent me an email asking if I had heard of this man's story because they are a local Christian family who lost his wife; his three children's mother in a car accident.

I sat and read his blog for a very long time that day, with tears streaming down my face. It was so raw and so real and just so possible for any one of us to experience. I went to church that week and asked for prayer for this family. They were always on my heart and my mind.


Fast forward a few months later, and I saw on the blog that Leigh Ann's best friend Andra started up an awesome organization called "Leigh's Blankies". You can read all about her story here


One Saturday recently, my husband and the kids and I were out and about and stopped by a yard sale in our neighborhood. I hopped out of the car really quick to take a peak and saw a sign talking about "Leigh's Blankies". I spoke out loud my thoughts and low and behold, I was meeting the sweet woman who started this! 


(an orphanage in Haiti just received 20 new blankets!)

This same yard sale raised $750.00 for Leigh's Blankies. This week, Andra got a request in for an order of 70 xl boys' blankets. The cost to make these blankets? 756.00! Totally God! 

God is using them to do great and mighty things for children around the world by providing blankets and spreading His love! It is exciting! They are in need of donations, Sewers (they have kits that can be picked up and completed at home and brought back!) and any help you would like to give. PLEASE "like" their facebook! I can not wait to get involved in this God-led group helping others out and I am so excited to see what God has in store!


Pin It

Monday, May 23, 2011

Thrifty Little Apron Tutorial and Giveaway

What can you do with some curtains, sheets or even an old muumuu? Lots of things, of course! I got a pretty flat sheet from the thrift store and made it into this:


Do you want it? I am giving it away this week at Thrifty Decorating! Leave a comment at her blog this evening through Thursday and you can enter to win it Friday! Follow me and leave a comment that you did so and receive an extra entry! Follow her and leave a comment that you did so and receive an extra entry! That is three chances!

Tutorial:
First let me apologize for the dark pictures. Sometimes, my sewing is done late at night once the kids are in bed :)

Using a flat sheet (because of the finished hems), an old curtain to use for trim, and ric rac and two d-rings I had here, I made up this thrifty little tutorial so that you too can make this apron. 


(please don't gauge the pieces in picture to actual measurements for apron. there's extra pieces and different sizes of fabric. this is just an example of the three coordinating fabrics you will use.)

For Apron Body, you will need two pieces
  • for top, cut 13 inches W x 12 1/2 long. 
  • for bottom, cut 24 inches x 24 inches


For straps you will need: 
  • 2 d rings
  •  2 fabric pieces 4 inch x 36 inch long (side straps)
  • 1 piece 4 inch x 3 inch long (for d rings)
  • 1 piece 4 inch x 24 inch long (neck strap)

For pocket you will need:
  • 1 7x7 cut on fold, or 7x14 not cut on fold
  • 1 7x3 cut on fold or 1 7x6 not cut on fold
  • ric rac


Bottom Edge
  • 1 4 inch x 25 inch piece
  • ric rac 

Let's start cutting and sewing! 

For the top, see how i used the top of the sheet for my top hem? it makes it sturdier because the hem is bigger than the bottom of the sheet would be. 


now fold this in half and cut diagonally 2 1/2 inches at your starting point


Open your piece back up and you should have a trapezoid. 


(trapezoid in case you need a picture :))


Now fold over 1/4 an inch on sides, iron and fold again, and iron. Sew. This is your side hems for the top. (Your bottom edge of the top should still be raw)


Now let's make a pocket. I am using old gingam fabric and an old curtain for the pocket and the straps. 

Cut your pocket on the fold 7x7 (sorry i dont have a picture of this)

The cut your trim piece on the fold, 7x3 (or you can just cut 7x6 and fold it)


Trim piece:


now fold into the center on both sides and iron.


The fold again and iron


insert your pocket into the trim piece so that the trim pieces sandwich the raw edges. the fold of the pocket should be at the bottom. 

now sew the trim on:


add ric rac over the sewn line: pin and sew


fold side edges in on wrong side of pocket and iron


Pin it in the center of your top portion of your apron and then sew all three sides on, leaving top.


Pocket is complete!


Now lets work on top straps.


 Fold over right sides together and sew shut to make a long tube:


Using a safety pin, turn right side out:


Then iron flat and top stitch the long sides, leaving the ends open.


Now take your tiny strap piece, slide d-rings on and sew into place across d rings:


Pin onto the top of your top piece like this:


and sew on:


Sew on your neck strap on the other edge of the top piece and then finish the edge not sewn on by folding over and ironing and then folding into a diagonal. sew into place.


top is finished! Let's work on the bottom.

Your bottom edge of the bottom piece should already be hemmed, thanks to the sheet's edge. All you need to do is the two side pieces. Fold over 1/4 inch, iron, fold again and iron, then sew for both sides.


Now we are going to take the top raw edge of the bottom piece and make pleats. If you do not want to make pleats, you can also gather it the width of the bottom of the top piece. 

Fold a 1/2 inch and pin every couple of inches until your pleats are all symmetrical and the width matches the width of your bottom top piece.


Iron pleats


and sew across 1/4 inch down from edge


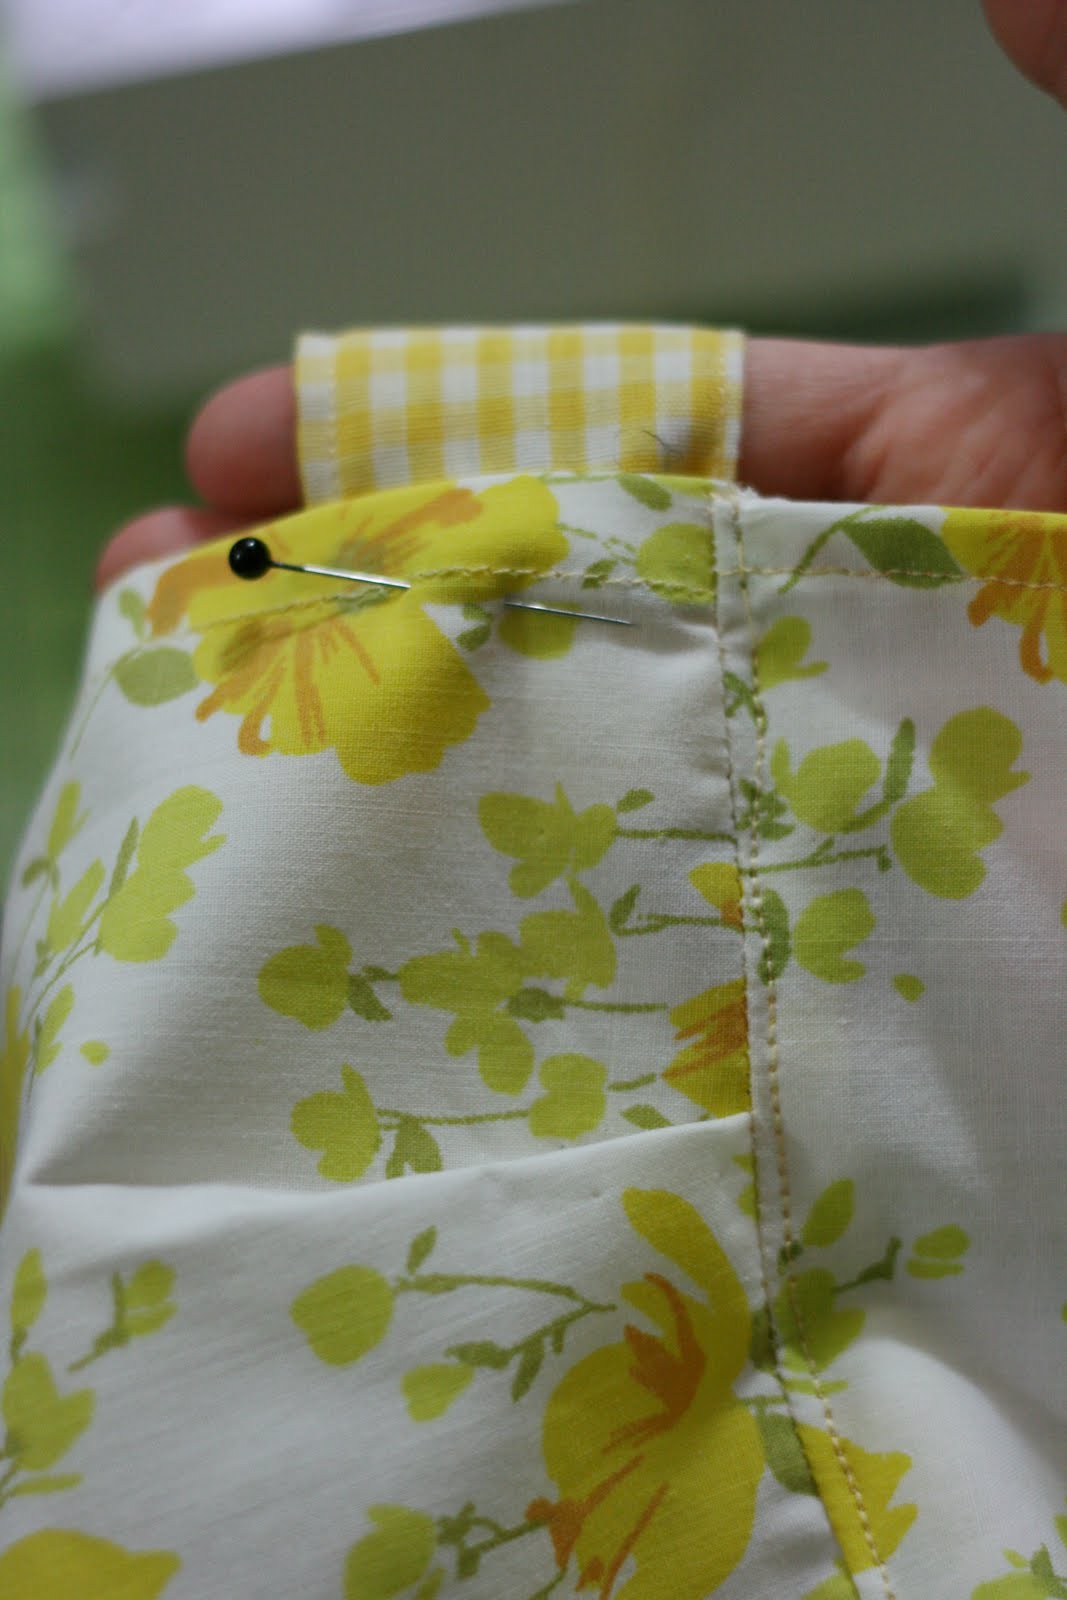
Now pin right sides together, and sew top of apron onto bottom of apron:


top stitch.


Tada! Main body piece is finished! Now for side straps:

Using same method as the neck straps, do both side straps, then sew onto the sides of the bottom portion of apron where top was sewn on like this:


Side straps are finished!

Now, you can stop and be done since your bottom edge is hemmed for you, or you can add more of the curtain and ric rac to finish the edge. 

Fold over your 4 inch x 25 inch bottom edge and iron.


For side edges: fold 1/4 inch, iron and repeat. Sew into place. Do this for both edges.


Pin piece onto bottom of apron and sew on


Then add ric rac where you just sewed.


Your apron is now finished! Step back and admire your thrifty work!


Pin It

LinkWithin

Related Posts with Thumbnails